
3 docker best practices to muscle up your game
Not so long ago, I realised something disturbing.
I knew many best practices in different domains : python, how to train a good model, how to save money on the cloud.
But for Docker, things were not so clear. That was a clear indicator that I should probably learn a lot more about it.
After a few discussions and reading on the topic, I collected a small set of resources that should help everyone feel more confident that they use Docker properly
The essentials of Docker
This part is an intro for the best practices.
Without it, the article could feel incomplete and frustrating if you did not spend enough time on Docker.
Docker in a nutshell
Docker is a platform for containerization that had a transformative impact in the software world. Docker enables the packaging of applications and their dependencies into portable containers, which can run consistently across diverse computing environments.
Docker also simplifies application management, accelerates deployment, and optimizes resource utilization by sharing the host operating system’s kernel.
Why Docker ?
Docker started to be used around 2013 and became a key skill to have in the tech industry. However, this does not tell a lot on the “why” it became popular.
Docker gained widespread adoption because it provided a better alternative than other option at the time. Let’s see it in details :
-
Lighter than Virtual Machines:
Virtualization technologies, such as VMware and VirtualBox, were commonly used. VMs provide full virtualization of an entire operating system, allowing multiple applications with their dependencies to run on a single physical server. While effective, VMs are heavier than containers in terms of resource usage, and the startup time is typically slower.
-
Simpler than traditional configuration management tools:
Tools like Puppet, Chef, and Ansible were used for automating the configuration of servers and ensuring consistency across different environments. These tools focused on managing the software configuration on servers but didn’t provide the same level of isolation and portability as containers.
-
More automated deployment:
In many cases, deployment involved manual steps, where developers or system administrators configured servers and installed dependencies manually. This manual process often led to inconsistencies between development, testing, and production environments.
Docker 101
We have seen why Docker has become widespread, but not how to use it.
However, there are countless tutorials on Docker 1 2, so I won’t create a new one.
But for illustration purpose, here is what you can expect to see in Dockerfile. It will be useful when we will review the best practices.
# Use an official Python runtime as a base image
FROM python:3.9

# Set the working directory in the container
WORKDIR /usr/src/app

# Copy the application source code to the working directory
COPY . .

# Install app dependencies
RUN pip install -r requirements.txt

# Define the command to run the application
CMD ["python", "app.py"]
In a nutshell :
- We start with a
python:3.9image - Create a directory in the system
/usr/src/appthat will be used for the next operations - The COPY command will copy all the current directory into the container
- We proceed to dependencies installs
- The default command when the container will run will be
python app.py
Docker best practices
In the previous section, we have seen why Docker is useful. Now the question is how does it work exactly and how can I make it run more efficiently.
1 - Avoid unnecessary build time
You can increase the speed of consequent build by optimizing the order of the operations.
Let’s see an example of the consequences of an unoptimized Docker file (like the one of the previous section)
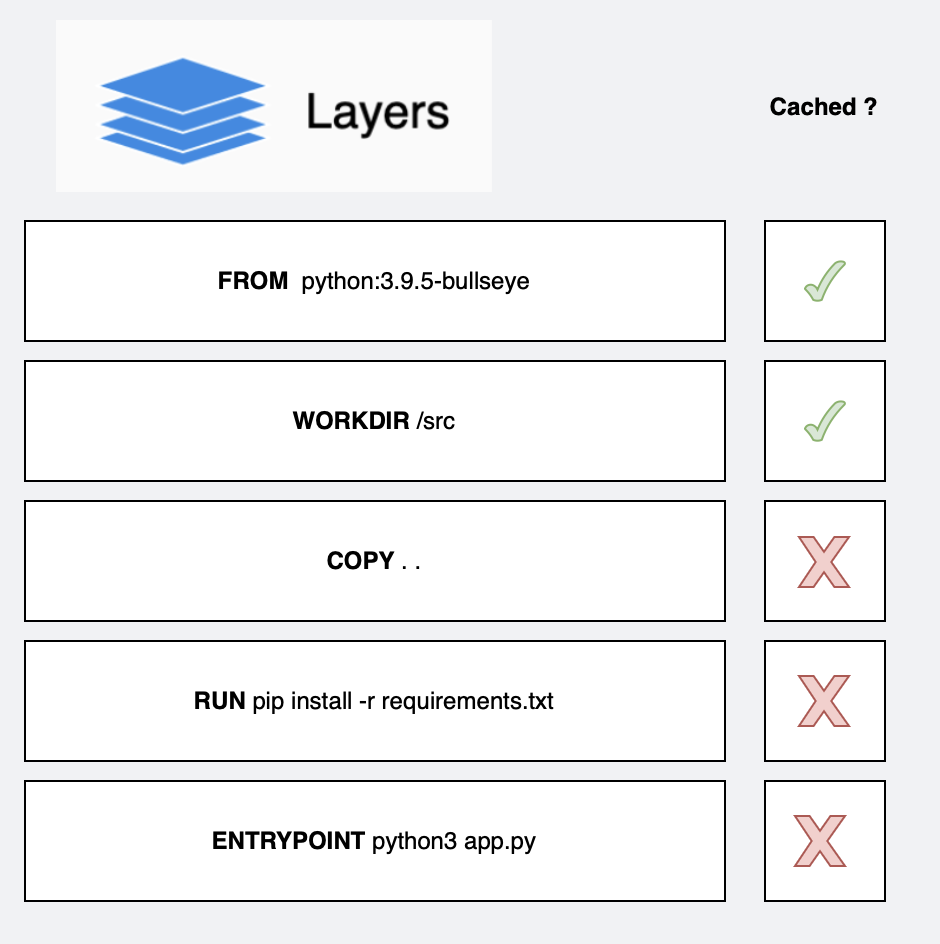
In this example, a COPY . . is done early in the build.
Hence, after any modification of a file in the project,
the build process will restart from the COPY and redo a potentially unnecessary install of the dependencies.
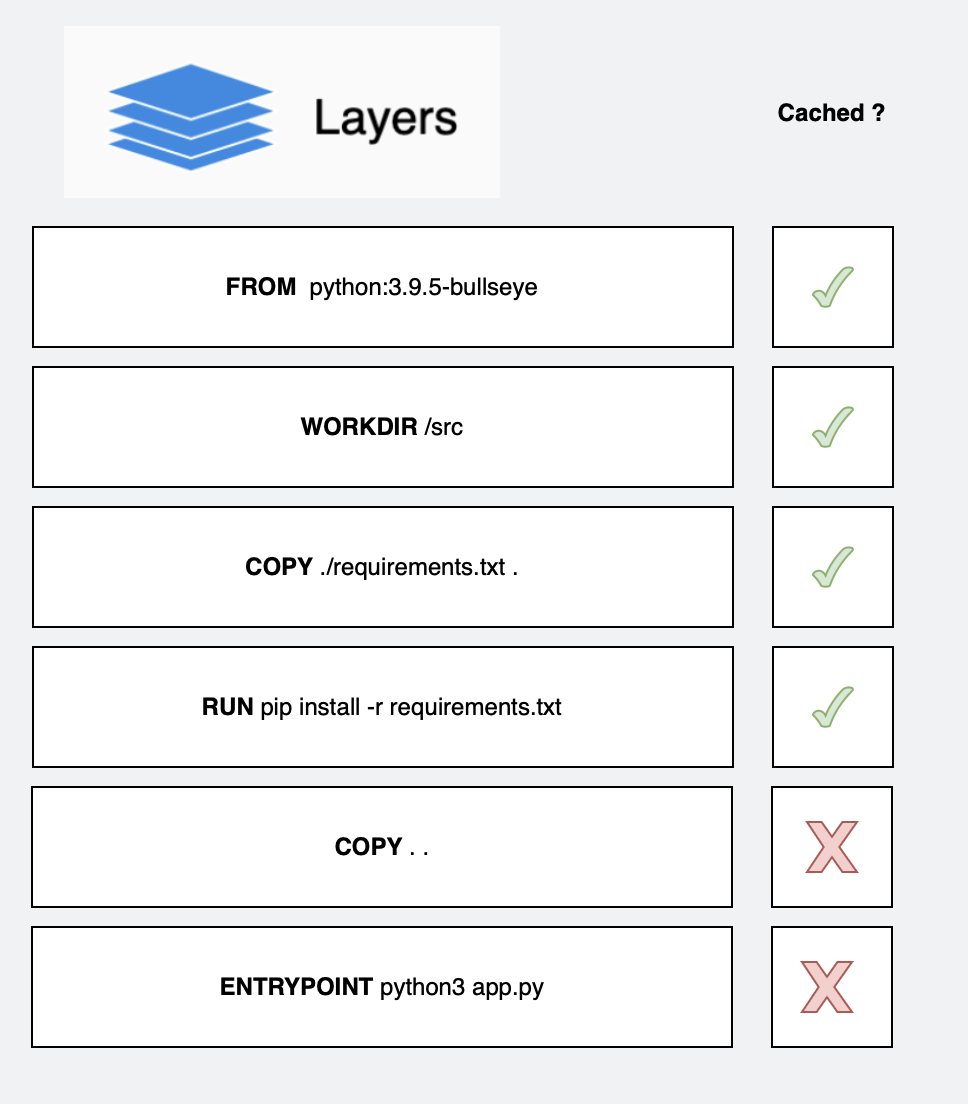
On the other hand, if only the requirements file is copied, one can skip the requirements install if no dependency changed.
2 - Multiple stage
Stages allow to build your Docker image in separate parts, usually into a builder and a runtime image.
Let’s see an example.
# Stage 1: Build Stage
FROM python:3.8 AS builder

WORKDIR /app

# Copy only the dependency files to leverage Docker cache
COPY pyproject.toml poetry.lock .

# Install build dependencies
RUN pip install --upgrade pip poetry && \
    poetry config virtualenvs.create false && \
    poetry install --no-interaction --no-ansi

# Stage 2: Server Stage
FROM python:3.8-slim as server

WORKDIR /app

# Copy installed dependencies from the builder stage
COPY --from=builder /usr/local/lib/python3.8/site-packages/ /usr/local/lib/python3.8/site-packages/

# Copy the rest of the application code
COPY . .

# Command to run your application
CMD ["python", "app.py"]

# Stage 3: Worker Stage
FROM python:3.8-slim as worker

WORKDIR /app

# Copy installed dependencies from the builder stage
COPY --from=builder /usr/local/lib/python3.8/site-packages/ /usr/local/lib/python3.8/site-packages/

# Copy the rest of the application code
COPY . .

# Command to run your application
CMD ["python", "worker.py"]
What are the benefits ?
- No need to rebuild the builder stage if the dependencies stay the same
- You can build with a full python image and only keep a slim image for runtime, gaining 300Mb of space
- You can use the same set of dependencies once for 2 different runtimes : a server and a worker
3 - Add a baked-in healthcheck to your web app
You can add a health check to your images.
Why ? When your app depends on other services, you can know in real-time when things go wrong.
How to implement it ?
FROM nginx:latest

HEALTHCHECK CMD curl --fail http://localhost/api/healthcheck || exit 1
This can also be implemented in a docker compose file, where it makes more sense from a system perspective.
version: '3'
services:
  web:
    image: nginx:alpine
    healthcheck:
      test: ["CMD", "wget", "-qO-", "http://localhost/"]
      interval: 30s
      timeout: 3s
      retries: 3
Conclusion
I hope these tips will support you in building more efficient Docker apps.